Setting up Facebook Conversion API with Reactiv
Prequisites
Reactiv uses these two values, your Dataset ID and an Access Token, to send your app's shopping events (product views, add to cart, checkout, purchase and more) to Meta through the Conversions API.
You'll need admin access to the Meta business portfolio that owns your ad account, and a Meta developer account. The first time you create an app, Meta asks you to register as a developer at developers.facebook.com; this is free and only takes a minute. Plan on about 15 minutes for the whole setup.
A quick note on names, because Meta has renamed a few things. Business Manager is now part of Meta Business Suite, and the Meta Pixel now lives inside a dataset. If you already have a pixel, its Pixel ID and its Dataset ID are the same number.
Step 1: Open Meta Business Suite
- Go to business.facebook.com and sign in.
- In the top-left corner, use the business portfolio drop-down to select the business portfolio that owns your ad account. Everything you create in the next steps is stored in this portfolio.
Step 2: Create an app
Reactiv links your dataset to a Meta app so your events are associated with your mobile app. If your business already has an app under Business settings, you can skip to Step 3 and use it.
-
Open Business settings. From the left-side menu click Settings, then Business settings, or go directly to business.facebook.com/settings.
-
On the left-side menu, go to Accounts > Apps
-
Click the Add button and choose Create a new app ID. You'll be taken to Meta for Developers.
-
On the App details screen:
- Enter an App name (for example, your store's name).
- Enter an App contact email
- Click Next
-
On the Use cases screen, select Create and manage app ads with Meta Ads Manager andClick Next.
-
On the Business screen: Select the business portfolio you chose in Step 1 & Click Next
-
On the Requirements screen, click Next. Nothing on this screen is required for the Reactiv integration, and you don't need to submit for App Review.
-
On the Overview screen, review your choices and click Go to dashboard.
Step 3: Create a dataset for your app
- Open Events Manager at business.facebook.com/events_manager2. (From Meta Business Suite, it's under All tools > Events Manager). Confirm the correct business portfolio is selected in the top-left corner.
- On the left-side menu, click Data sources, then select the app you created in Step2.
- Open the Settings tab.
- In the dataset linking section, click Link (You can also start from the Link to dataset button on the app's Overview tab.)
- Meta walks you through creating the dataset. When asked how you'd like to create it, choose Create new. This creates a new dataset with its own Dataset ID rather than reusing an existing pixel.
- Accept Meta's terms and click Create.
Your new dataset has the same name as your app.
Tip: If you already have a Meta Pixel for your website and want your app events and website events in one dataset, Meta also offers Create from a pixel ID in this flow. Your Dataset ID is then the same as your existing Pixel ID. This guide assumes a new dataset.
Step 4: Copy your Dataset ID and generate an access token
- In Events Manager, click Data sources and select the dataset you just created. It has the same name as your app and is listed as a dataset, not an app. If you have many data sources, filter the list by Datasets.
- Open the Settings tab. Your Dataset ID is shown at the top of the page (it also appears under the dataset's name in the Data sources list). Copy it; you'll need it in Step 5.
- Scroll down to the Conversions API section and find Set up direct integration
- Select Set up with Dataset Quality API. This is Meta's recommended option. Either option works with Reactiv.
- Click Generate access token. If Meta asks you to choose a dataset, select the dataset you created and click Generate access token again.
- Copy the token and store it somewhere safe, such as a password manager. Meta does not store it, so if you lose it you'll need to generate a new one. Treat it like a password.
Step 5: Add the credentials to Reactiv
- Sign in to the Reactiv Dashboard and go to Integrations
- Open Facebook Conversion API.
- Paste your Dataset ID and Access Token
- Save and enable the integration.
Step 6: Confirm events are arriving
Once shoppers start using your app, events appear in Events Manager under Data sources > your dataset > Overview. Events sent by Reactiv show Server (Conversions API) as their connection method. Allow a few minutes for new events to show up.
Reactiv sends the following events to your dataset: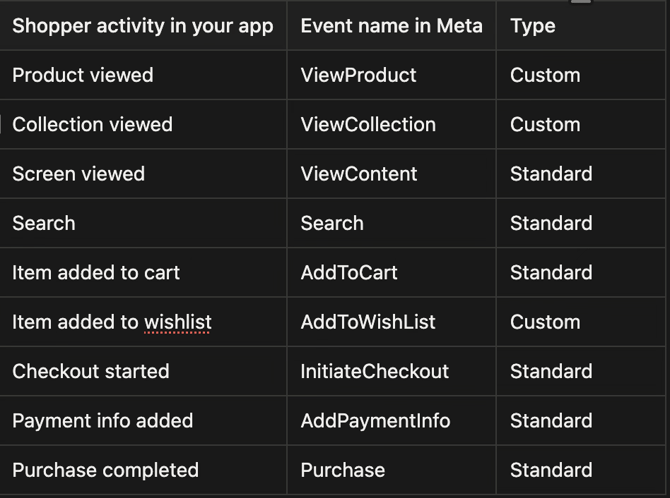
Standard events can be used directly as conversion goals in Ads Manager. To optimize for a custom event, first create a custom conversion from it in Events Manager.
Troubleshooting
- No events are showing up - Reactiv only sends an event to Meta when the shopper has allowed tracking (for example, accepted the App Tracking Transparency prompt on iOS) or opened your app from a Meta ad. If you're testing on your own device, make sure tracking is allowed for your app. Also double-check that the Dataset ID in Reactiv matches the ID shown in Events Manager.
- Events don't appear in the Test events tab - The Test events tab only shows server events sent with a test event code, which Reactiv doesn't use. Check the Overview tab instead.
- Meta reports an invalid or expired access token - Access tokens generated in Events Manager don't expire on their own, but they stop working if the token or the system user behind it is removed. Repeat Step 4 to generate a new token, then update it in the Reactiv Dashboard.
- The Generate access token button isn't there - Make sure you're an admin of the business portfolio and have full control of the dataset. Check under Business settings > Data sources > Datasets
- If you encounter issues during the setup, please contact our support team via chat or email.