Setting up AppsFlyer Attribution with Reactiv
Prerequisites
Before you begin, make sure you have:
- An AppsFlyer account with your iOS and/or Android app already added. (See AppsFlyer's Adding an app to AppsFlyer)
- Admin access to your AppsFlyer account — only admins can create the S2S API token used for server‑side tracking.
- Access to your Reactiv dashboard with permission to manage integrations and build settings.
How AppsFlyer attribution works in Reactiv
Reactiv sends data to AppsFlyer through two paths, so you'll enter credentials in two places in the dashboard.
| Where you enter it | What it powers | What goes there |
| Integrations → AppsFlyer Attribution (the integration card) | Server‑to‑server (S2S) event tracking — Reactiv's servers send purchases, sign‑ups, and other events straight to AppsFlyer | S2S API Token, App IDs, OneLink settings |
| Builds → Settings → Integration Settings tab | The on‑device AppsFlyer SDK that ships inside your app build — measures the install itself and handles deep links | AppsFlyer Dev Key, App IDs |
You don't need to manage Associated Domains by hand. When you save the integration card, Reactiv automatically syncs your OneLink domains into your build's associated‑domains settings (and removes them if you disable or delete the integration).
Tip: Set up the integration card first, then the build settings. New build settings> only take effect on your next app build.
Step‑by‑step guide
Step 1 — Gather your credentials in AppsFlyer
Log in to AppsFlyer and collect the following:
- Your App ID for each platform (iOS and/or Android)
- Your Dev Key
- An S2S API Token (admin only)
- Your OneLink subdomain, template ID, and OneLink API key
Step 2 — Connect the AppsFlyer Attribution integration
- In the Reactiv dashboard, go to Integrations.
- Find the AppsFlyer Attribution card and click Connect (or Manage if it's already set up).
- Fill in the fields:
| Field | Required | What to enter | |
| iOS App ID | Yes | At least one iOS or Android App ID is required | Your AppsFlyer iOS app id, e.g. id123456789 |
| Android App ID | Yes | At least one iOS or Android App ID required | Your app's package name, e.g. com.merchant.app |
| S2S API Token | Yes | Your server‑only AppsFlyer S2S auth token. This is never sent to the device. | |
| OneLink Subdomain | Yes | Your OneLink subdomain label only, e.g. mymerchant (Reactiv composes it to mymerchant.onelink.me). Don't include https://, a path, or the .onelink.me suffix. | |
| OneLink Template ID | Yes | Your OneLink template id, e.g. 8Xy3. Provide together with the OneLink API Key. | |
| OneLink API Key | Yes | Your server‑only OneLink REST API key (used to mint campaign links). Never sent to the device. Provide together with the Template ID. | |
| App Clip Bundle ID | Optional | Your iOS App Clip bundle id, e.g. com.merchant.app.Clip. |
- Click Save.
Step 3 — Add your build credentials
These values are compiled into your app and power the on‑device AppsFlyer SDK.
- Go to Builds → Settings and open the Integration Settings tab.
- In the AppsFlyer section, fill in:
| Field | What to enter |
| AppsFlyer Dev Key | Your AppsFlyer Dev Key — required to enable install attribution in the app |
| AppsFlyer iOS App ID | Your App Store Connect numeric ID, e.g. 1234567890 (digits only — no id prefix) |
| AppsFlyer Android App ID | Your app's package name, e.g. com.merchant.app |
- Click Save.
The next time your app is built, these credentials are baked in and the AppsFlyer SDK activates. (If the Dev Key is left blank, the SDK stays inactive.)
Step 4 — (Optional) Deep links and Associated Domains
If you supplied OneLink details in Step 2, Reactiv automatically keeps your build's Associated Domains in sync with your OneLink domain — there's nothing to enter byhand. The domains are added when the integration is enabled and removed when it'sdisabled or deleted.
Good to know: Because associated‑domain changes are applied to your build settings, they take effect on your next build.
Where do I find my credentials?
How do I find my App ID?
In AppsFlyer, open Settings → App Settings. Your App ID format depends on the platform:
-
iOS App ID —
idfollowed by your 9–10 digit App Store ID, e.g.id123456789. The numeric part (123456789) is your App Store Connect ID.- Enter the full value (
id123456789) on the integration card. - Enter the numeric‑only value (
123456789) in Build Settings.
- Enter the full value (
-
Android App ID — your app's package name, e.g.
com.merchant.app. Use the same value in both places.
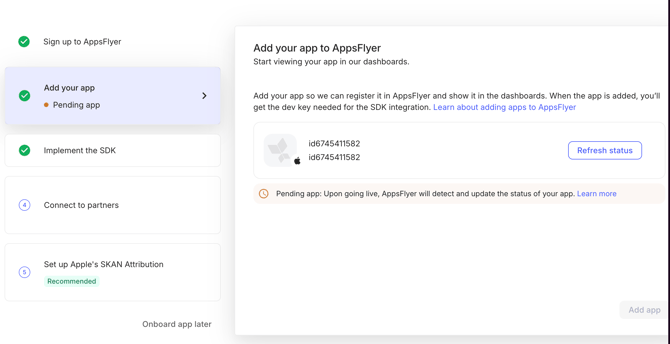
Your App ID is shown when you add your app in AppsFlyer (e.g. id6745411582). Adding theapp is also where AppsFlyer generates the Dev Key used for SDK integration.
Where do I find my Dev Key?
In AppsFlyer, go to Settings → App Settings → Dev Key Management, then copy your Dev Key. By default all apps in your account share the same Dev Key. Enter it in Builds →Settings → Integration Settings → AppsFlyer.
See AppsFlyer's Dev Key management.
Where do I find my S2S API Token?
The S2S API Token authenticates Reactiv's server‑to‑server event postbacks.
- In AppsFlyer, open your Account settings > Security and find the Apps Flyer Tokens section.
- Create an S2S API token and copy it.
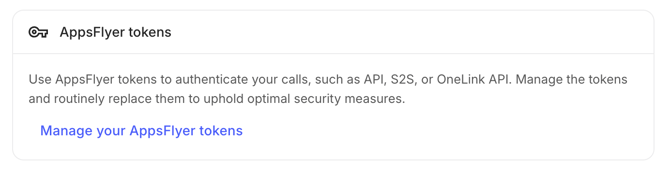
The AppsFlyer Tokens area manages your API, S2S, and OneLink API tokens — click Manage your AppsFlyer tokens to create one.
Where do I find my One Link API Token?
The OneLink API Token authenticates Reactiv's integration to create Links.
- In AppsFlyer, open your Account settings > Security and find the Apps Flyer Tokens section.
- Create an Onelink API token and copy it.
Important: Only account admins can view and create tokens. A new token may take up to 30 minutes to activate. Wait until its status changes from Pending to Active before using it.
Enter this value in the One Link API Token field on the integration card.
See AppsFlyer's Managing AppsFlyer tokens
Where do I find my OneLink subdomain, template ID, and API key? *(optional)*
OneLink powers branded deep links. In AppsFlyer, go to Engage → OneLink Custom Links (or Engage → Branded Domains).
A OneLink template looks like https://onelink-basic-app.onelink.me/H5hv:
- OneLink Subdomain — the subdomain label, e.g.
onelink-basic-app. In Reactiv enter only the label (e.g.mymerchant), not the full URL. - OneLink Template ID — the short path id at the end, e.g.
H5hv. - OneLink API Key — a OneLink REST API key, created under your AppsFlyer Account settings (admin only).

The Template ID appears at the top of the OneLink template (e.g. 8Xy3). The subdomain is the part before .onelink.me in your links (e.g. reactiv-dev fromreactiv-dev.onelink.me/8Xy3/…) — enter just that label in Reactiv.
See AppsFlyer's Create a OneLink template and OneLink guide
Supported events & mapping
Once connected, Reactiv maps your store's shopper events to AppsFlyer's standard eventnames automatically:
| Reactiv event | AppsFlyer event |
| App installed | af_install |
| App opened | af_app_opened |
| Account sign‑up | af_complete_registration |
| Account sign‑in | af_login |
| Product viewed | af_content_view |
| Add to cart | af_add_to_cart |
| Checkout started | af_initiated_checkout |
| Purchase | af_purchase |
Purchase de‑duplication: Purchases carry the Shopify order id (sent to AppsFlyer as> af\_order\_id), so AppsFlyer automatically collapses any duplicate purchase events.
Additional notes & troubleshooting
- Server‑only credentials never reach the device. Your S2S API Token and OneLink API Key are stored securely server‑side and are never compiled into your app.
- Build‑time vs. live changes. Integration‑card changes apply right away to server‑side tracking. Build Settings (Dev Key, App IDs) and Associated Domains only take effect on your next app build.
- At least one App ID is required on the integration card; provide iOS, Android, or both depending on the platforms you ship.
Documentation & support
- https://support.appsflyer.com
- https://support.appsflyer.com/hc/en-us/articles/207377436-Adding-an-app-to-AppsFlyer
- https://support.appsflyer.com/hc/en-us/articles/37139123425809-Dev-Key-management
- https://support.appsflyer.com/hc/en-us/articles/360004562377-Managing-AppsFlyer-tokens
- https://support.appsflyer.com/hc/en-us/articles/115005248543-OneLink-guide
If you run into any issues connecting AppsFlyer, contact the Reactiv support team and we'll be happy to help.